How to Integrate Razorpay Payment Gateway in Laravel
Razorpay is a widely used payment gateway in India that allows businesses to accept online payments securely and efficiently. In this article, we will explore how to integrate the Razorpay payment gateway with a Laravel web application. We'll create a simple checkout form that allows users to make payments and handle the payment success and failure scenarios.
Before we start, make sure you have the following prerequisites:
- Laravel installed on your system.
- A Razorpay account and API credentials (API Key and Secret Key).
Step 1: Install Razorpay SDK
Let's begin by installing the Razorpay PHP SDK using Composer. Open a terminal and run the following command:
composer require razorpay/razorpayStep 2: Configure Razorpay Credentials
Next, configure your Razorpay API credentials in the config/services.php file. Add the following code to the array:
'razorpay' => [
   'key' => env('RAZORPAY_KEY'),
   'secret' => env('RAZORPAY_SECRET'),
],
Also, make sure to set your Razorpay API Key and Secret in the .env file like this:
RAZORPAY_KEY=your_razorpay_api_key
RAZORPAY_SECRET=your_razorpay_api_secret
Step 3: Create the RazorpayController
Now, let's create a controller named RazorpayController to handle the payment process. Run the following command in the terminal:
php artisan make:controller RazorpayControllerIn the RazorpayController.php file, add the necessary methods to handle payment creation and success/failure scenarios. The code for the RazorpayController can be found in the provided code snippet.
<?php
namespace App\Http\Controllers;
use Razorpay\Api\Api;
use Illuminate\Http\Request;
class RazorpayController extends Controller
{
   public function pay()
   {
       return view('payment.pay');
   }
   function create(Request $request)
   {
       $this->validate($request, [
           'name' => 'required',
           'phone' => 'required',
           'email' => 'required'
       ]);
       $api = new Api(config('services.razorpay.key'), config('services.razorpay.secret'));
       $order = $api->order->create(
           array(
               'amount' => (20 * 100),
               'currency' => 'INR',
               'notes' => ['testing payment..']
           )
       );
       return response()->json(($order->toArray() + $request->all()));
   }
   function success(Request $request)
   {
       if ($request->razorpay_order_id) {
           try {
               $api = new Api(config('services.razorpay.key'), config('services.razorpay.secret'));
               // Verify the payment
               $payment = $api->order->fetch($request->razorpay_order_id);
               if ($payment->status === 'attempted') {
                   // Payment is successful
                   return view('payment.success', compact('payment'));
               }
           } catch (\Throwable $th) {
               //throw $th;
           }
       }
       // Payment failed
       return view('payment.failure');
   }
}
Step 4: Create Blade Views
Create the Blade views (pay.blade.php, success.blade.php, and failure.blade.php) and place them in the resources/views/payment directory.
resources\views\payment\pay.blade.php
<!DOCTYPE html>
<html lang="en">
<head>
   <meta charset="UTF-8">
   <meta name="viewport" content="width=device-width, initial-scale=1.0">
   <meta http-equiv="X-UA-Compatible" content="ie=edge">
   <meta name="csrf-token" content="{{ csrf_token() }}">
   <title>Document</title>
   <link href="https://cdn.jsdelivr.net/npm/bootstrap@5.3.0/dist/css/bootstrap.min.css" rel="stylesheet">
   <script src="https://cdn.jsdelivr.net/npm/bootstrap@5.3.0/dist/js/bootstrap.bundle.min.js"></script>
</head>
<body>
   <div class="container">
       <div class="py-5 text-center">
           <h2>Checkout form</h2>
       </div>
       <div class="row">
           <div class="col-md-4 order-md-2 mb-4">
               <h4 class="d-flex justify-content-between align-items-center mb-3">
                   <span class="text-muted">Your cart</span>
                   <span class="badge badge-secondary badge-pill">3</span>
               </h4>
               <ul class="list-group mb-3">
                   <li class="list-group-item d-flex justify-content-between lh-condensed">
                       <div>
                           <h6 class="my-0">Product name</h6>
                           <small class="text-muted">Brief description</small>
                       </div>
                       <span class="text-muted">$12</span>
                   </li>
                   <li class="list-group-item d-flex justify-content-between lh-condensed">
                       <div>
                           <h6 class="my-0">Second product</h6>
                           <small class="text-muted">Brief description</small>
                       </div>
                       <span class="text-muted">$8</span>
                   </li>
                   <li class="list-group-item d-flex justify-content-between">
                       <span>Total (USD)</span>
                       <strong>$20</strong>
                   </li>
               </ul>
           </div>
           <div class="col-md-8 order-md-1">
               <h4 class="mb-3">Billing address</h4>
               <form action="{{ route('payment.create') }}" method="POST" class="payment_create needs-validation" novalidate>
                   <div class="row">
                       <div class="col-md-6 mb-3">
                           <label for="name">Name</label>
                           <input type="text" class="form-control" name="name" placeholder="" value="" required>
                       </div>
                       <div class="col-md-6 mb-3">
                           <label for="phone">Phone</label>
                           <input type="text" class="form-control" name="phone" placeholder="" value="" required>
                       </div>
                       <div class="col-md-12 mb-3">
                           <label for="email">Email</label>
                           <input type="text" class="form-control" name="email" placeholder="" value="" required>
                       </div>
                   </div>
                   <hr class="mb-4">
                   <h4 class="mb-3">Payment</h4>
                   <div class="d-block my-3">
                       <div class="custom-control custom-radio">
                           <input id="credit" name="paymentMethod" type="radio" class="custom-control-input" checked required>
                           <label class="custom-control-label" for="credit">Debit/Credit Card/UPI/Net Banking</label>
                       </div>
                   </div>
                   <hr class="mb-4">
                   <button class="btn btn-primary btn-lg btn-block" type="submit">Place Order</button>
               </form>
           </div>
       </div>
   </div>
   <script src="https://ajax.googleapis.com/ajax/libs/jquery/3.6.4/jquery.min.js"></script>
   {{-- razorpay --}}
   <script src="https://checkout.razorpay.com/v1/checkout.js"></script>
   <script>
       $('.payment_create').submit(function(e) {
           e.preventDefault();
           var form = $(this)
           $.ajax({
               headers: {
                   'X-CSRF-Token': $('meta[name=csrf-token]').attr('content')
               },
               url: form.attr('action'),
               type: 'POST',
               data: form.serialize(),
               success: function(output) {
                   var options = {
                       "key": "{{ config('services.razorpay.key') }}",
                       "amount": output.amount * 100, // 2000 paise = INR 20
                       "currency": output.currency,
                       "name": "{{ config('app.name') }}",
                       "description": "Secure Payments Transaction",
                       "order_id": output.id,
                       "prefill": {
                           "name": output.name,
                           "email": output.email,
                           "contact": output.phone
                       },
                       "handler": function(response) {
                           console.log(response);
                           var url = '{{ route('payment.success') }}?razorpay_order_id='+response.razorpay_order_id;
                           window.location.replace(url);
                       },
                       "theme": {
                           "color": "#af7c7c"
                       },
                       "modal": {
                           "ondismiss": function() {
                               // window.location.replace('{{ route('payment.success') }}');
                           }
                       }
                   };
                   var rzp1 = new Razorpay(options);
                   rzp1.open();
               },
               error: function(xhr, textStatus, thrownError) {
                   $('.error').remove();
                   $.each(xhr.responseJSON.errors, function(index, value) {
                       form.find("input[name=" + index + "],select[name=" + index + "],textarea[name=" + index + "],select[name='" + index + "[]']").after("<span class='text-danger error'>" + value[0] + "</span>");
                   });
                   if (xhr.status == 401) {}
               }
           });
       });
   </script>
</body>
</html>
resources\views\payment\success.blade.php
<!DOCTYPE html>
<html lang="en">
<head>
   <meta charset="UTF-8">
   <meta name="viewport" content="width=device-width, initial-scale=1.0">
   <meta http-equiv="X-UA-Compatible" content="ie=edge">
   <meta name="csrf-token" content="{{ csrf_token() }}">
   <title>Document</title>
   <link href="https://cdn.jsdelivr.net/npm/bootstrap@5.3.0/dist/css/bootstrap.min.css" rel="stylesheet">
   <script src="https://cdn.jsdelivr.net/npm/bootstrap@5.3.0/dist/js/bootstrap.bundle.min.js"></script>
</head>
<body>
   <div class="container">
       <div class="py-5 text-center">
           <!-- Display payment success message -->
           <h1>Payment Successful!</h1>
           <h2>Transaction ID: {{ $payment->id }}</h2>
       </div>
   </div>
</body>
</html>
resources\views\payment\failure.blade.php
<!DOCTYPE html>
<html lang="en">
<head>
   <meta charset="UTF-8">
   <meta name="viewport" content="width=device-width, initial-scale=1.0">
   <meta http-equiv="X-UA-Compatible" content="ie=edge">
   <meta name="csrf-token" content="{{ csrf_token() }}">
   <title>Document</title>
   <link href="https://cdn.jsdelivr.net/npm/bootstrap@5.3.0/dist/css/bootstrap.min.css" rel="stylesheet">
   <script src="https://cdn.jsdelivr.net/npm/bootstrap@5.3.0/dist/js/bootstrap.bundle.min.js"></script>
</head>
<body>
   <div class="container">
       <div class="py-5 text-center">
           <h1>Payment Failed!</h1>
       </div>
   </div>
</body>
</html>
Step 5: Start the Development Server
We are almost ready to test the Razorpay integration. Start the Laravel development server by running the following command in the terminal:
php artisan serve
Step 6: Test the Payment Process
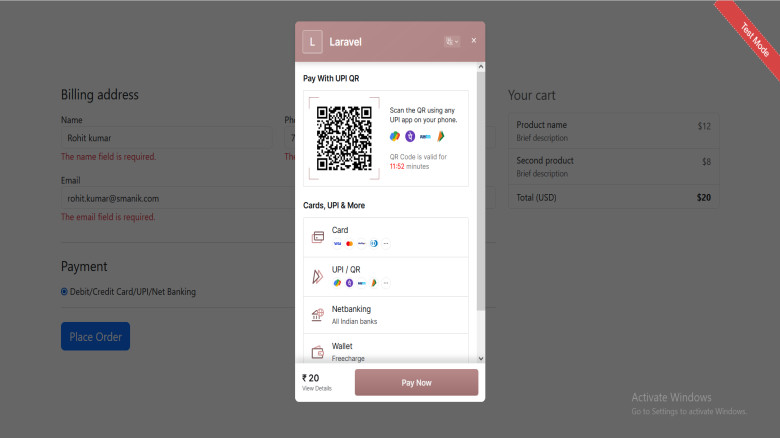
Visit http://localhost:8000/pay in your web browser. You will see a checkout form with billing address fields and a "Place Order" button.
Fill in the required details (name, phone, email) and click on the "Place Order" button. The Razorpay checkout modal will open, allowing you to complete the payment using various payment methods (Debit/Credit Card, UPI, Net Banking).
After completing the payment, you will be redirected to the payment success page (payment.success) if the payment is successful, or to the payment failure page (payment.failure) if the payment fails.


Leave A Comment